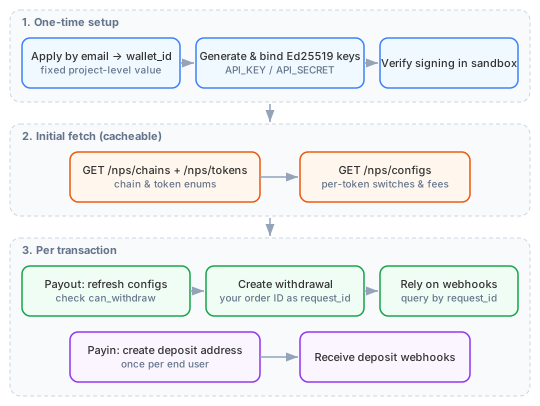
We recommend integrating in the following order. The phases differ in call frequency: phase 1 is one-time setup, phase 2 results are cacheable, and only phase 3 is called on every transaction.
Integration overview (click to enlarge)
Results of phases 1–2 can be stored long-term: the wallet_id and keys are fixed, and enum/fee configuration rarely changes. Only phase 3 is on the per-transaction path.
1
Contact us and create an account
Before using any API, you need to contact us to create an account and obtain a wallet_id.
Send an email to [email protected] with your company/project name, contact information, and a brief description of your business scenario
We will create a wallet for you, bind your project information, and assign administrator permissions
Once complete, you will receive a dedicated wallet_id
wallet_id is a fixed, project-level value: each project corresponds to one wallet_id, assigned by us. Store it in your configuration and pass the same value on every API call; you do not need to create wallets for end users or maintain a user-to-wallet_id mapping (end-user collection is handled by generating a per-user deposit address). When a new project is launched, we will assign it a new wallet_id.
Based on your business needs, confirm the following configuration items:Chains and tokens — Select the chains and tokens to enable. See Supported Tokens and Chains.Webhook callback — Provide a callback URL to receive transaction status updates in real time. See Webhook Overview.Payout configuration — If you need the payout function, confirm that Payout permissions are enabled for the relevant chain.
For configuration changes, please contact technical support. Do not modify settings yourself to avoid impacting business operations.
4
Understand the request specification
Before calling the interfaces, please read the following:
Request Specification
Request headers and authentication
API Signature
Signature calculation method
Transaction Status
Meaning and transitions of each status
Error Codes
Error codes and troubleshooting guide
5
Integration development
After completing the preparations above, choose the corresponding module based on your business scenario: